Pages

Thursday, May 31, 2012

Skirt week!

As if I need another reason to sew (under pressure, no less), Skirt Week is going on right now!  Clearly, I couldn't resist!  I love skirts and have a job where they are perfectly appropriate, so I get plenty of use out of any that I sew up.

I had purchased several different fabrics for this challenge, but settled on a lightweight linen I had in my stash because I really, really wanted to add some fun appliques.  I drafted the skirt from my measurements (thanks Whipstitch!), so no store-bought patterns were harmed in the making of this skirt :)
I love piping (really, who doesn't?), so I worked it into the design of the waistband and tiny coin pocket.  I considered adding it to the hem as well, but went with another plan (get to that later).
The coin pocket is functional!  I don't think it's sewn as elegantly as possible, since a quick search didn't pull up any tutorials (though I might have to write one now, with all my hard-earned knowledge), but it works.  While the pocket is big enough for a chapstick, I could probably get away with putting exactly a penny in there, since the skirt is a smidge on the snug side!


For me, having a lined skirt makes a world of difference.  They feel more complete, more substantial.  This one is fully lined with some kind of cotton blend I had in my stash.  I hand sewed the lining at the waistband.
For the hem, I took decided to try out an idea I had been mulling for a while.  While shortening the arms on one of my husband's dress coats, I realized that the lining is sewn in such a way to create the hem, but turning the outside fabric inward.  For this skirt, I made the lining using the same pattern as the skirt.  Before sewing the lining to the waistband, I cut about 1 inch off the bottom of the lining.  Then, with right sides together, I sewed the lining to the linen fabric and pressed the seam flat.   The lining was then pinned to the waistband, matching edges, creating a balloon-skirt effect at the bottom.  With some sharp shakes, the lining and linen worked themselves out a bit, and with additional smoothing and fanagling (and copious ironing!), the hem was done!
For the applique circles, I traced a ribbon spool, then hand cut and machine appliqued in place.  The fabric is some kind of silk/cotton upholstery fabric that I scored at the FabMo fabric giveaway here in Mountain View.   The circles continue on the back, too!


Sunday, May 27, 2012

Blouses to go with my light sweaters

"Have fun always carrying around a light sweater!", was the line from one character to another on "30 Rock" the other week.  It was mocking a life living in the (San Francisco) bay area, and the reason I'm still chuckling about it is because it is so true!  I live in the bay area, and I do, indeed, always wear a light sweater.  My professional "uniform" is pants, blouse and light cardigan.  And while I have a fully impressive collection of 3/4 sleeve cardigan sweaters, I lack an equally impressive collection of blouses to go underneath them. But I'm working on remedying that:
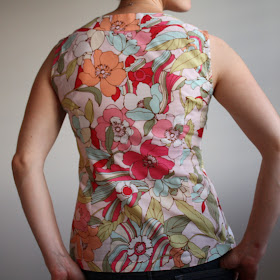
Using a RTW top in my closet, I rubbed off the pattern to make a cotton version (the original is dry-clean only silk), leaving off the sleeves and ties (there is not much less flattering than a bow hiding under the back of a sweater).  I rarely take off the sweater (unless my lecture hall is toasty), so I found that sleeveless tops work best so the thin-gauge sweaters don't look bulky in the arms.  
I love the elastic smocking under the bust, since not only is it flattering, but it's comfortable!  There is an invisible side zipper, but depending on the ease of the top, you can get away without a zipper if using enough elastic gathers.   While this top looks remarkably similar to my final entry to the Spring Top Sewalong, I actually used two different RTW tops to make the patterns! 
The back is very simple, with vertical darts and a slight sway-back adjustment (a horizontal dart, that is not super noticeable), but with my broad shoulders, I need to find a way to make the back more flattering (although I guess it's unimportant under a sweater!).
I've purchased many yards of cotton voile for tops over the past few months.  I need to get into blouse-making mode to clear out my stash (preferably before summer break, so I can actually use them for work!).  But first up, I have some fabric and ideas in mind for Skirt Week!


Friday, May 25, 2012

Spring 2012 Giveaway Winner!

Random number generator says...T, from Salty Peanut Stitchery is the winner!   Thank you to all of the folks who stopped by for the Giveaway, and for all of the good advice for squeezing sewing into a busy life.  My favorite (perhaps because I had just started to implement it) was from MysticMandy.  She says:

"Here's what I do.  I have trained my daughter to only want Daddy to help her get to bed at night.  That way I can sew and make other stuff while he gets her bath, bedtime stories, jammies, magic water (i.e. fiber supplements) and songs.  Sometimes it's nice to be the second-chair parent ;)".

Indeed!

Monday, May 21, 2012

Spring 2012 Giveaway!

Happy Giveaway Day and welcome to Nicole at Home!

For this giveaway, I'm going to keep it simple (for me, and for you!).  In the past, I have made items to give away, but what I lack in time I make up for in sewing supplies.  Let's be honest, I have purchased way more patterns and fabric than I can possible use, so why not give some of them away to someone who might have a chance at enjoying them?!  (And, as a bonus, I won't feel so guilty seeing these unused patterns in my pattern drawer!)

Up for grabs are two Amy Butler handbag patterns, the Madison and the Kimberly.  Opened, pondered, and vaguely planned for, but never actually used.  They are lovely and project-inspiring, no?

In the comments, please give some advice on how you make time for sewing OR some good ideas for sewing with kids.  Or both!  I will give both bag patterns away to a randomly selected someone.  Please make sure there is contact information in your response, or I won't be able to let you know of your win!

(If you'd like to return to the list of Giveaways, click here)

Thursday, May 17, 2012

Sit-upon what?

My son's first cub scout camping trip is this weekend (he's been counting the sleeps for a week!), and as a former girl scout, I pulled out the only pre-camping sewing activity I know--the infamous Sit-upon.  "Sit upon what?", my son asked.  For those of you who don't know, a Sit-upon is a mat to sit on while camping, made out of an old vinyl tablecloth, stuffed with layers of newspaper and whipstitched around the edge (at least when I made one, way back when).  We upgraded slightly with nice Mexican oilcloth (luckily, he's a young, carefree little boy, so he didn't balk at the only print I had on hand!) and a couple layers of fleece fabric for the inside.   I punched holes around the outside of both layers of oilcloth, but he sewed the whole thing himself!


He had so much fun sewing the first round, that he went back and added a second color of yarn going in the other direction.
Still excited about sewing after he finished, he spent some time rifling through my fabric bins.  As much as I love the idea of my little guy sewing, I had to overrule him when he pulled out some vintage wool plaid exclaiming that he wanted to make two pairs of socks!  With the summer break coming up fast, I'll definitely have to plan many more kid-friendly sewing projects.
Ready to sit on some wet ground!


Sunday, May 13, 2012

Mother's Day sewing

I received the most incredible Mother's Day gift today: uninterrupted time to sew. My husband took the boys to the aquarium for the day, so my day was free.  I did some cleaning and worked on writing a test...even drove into work to check on some bacterial plates for an experiment, but the majority of my day was spent working on these:

Wednesday, May 02, 2012

Lots of diaper covers

Aren't they pretty?  I just finished up a big (by my small potatoes scale) order of diaper covers.  Until this batch, I always made them individually, but I found ways to minimize the number of times I switched stitches and feet to streamline the process.   Now I might have to always make multiples!